Why Bike Fit Is the First Place to Look
Knee pain on the bike has gotten complicated with all the conflicting advice flying around. As someone who’s spent the last six years cycling seriously — everything from casual weekend 40-milers to a genuinely disastrous century attempt in August heat — I learned everything there is to know about this particular misery. Today, I will share it all with you.
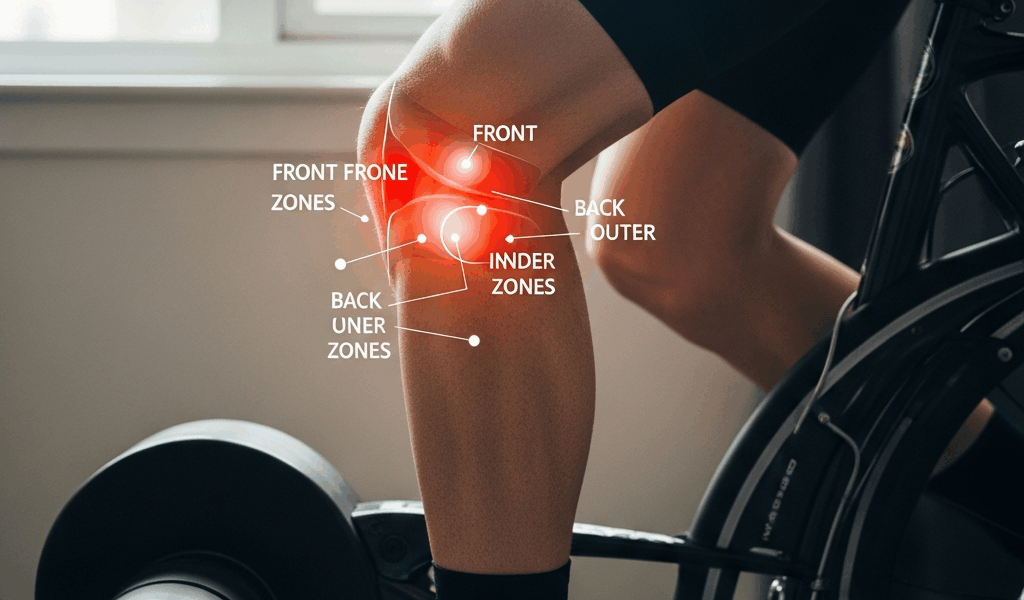
Here’s the thing most people miss: broken-feeling knees usually aren’t broken. The majority of cycling knee pain is mechanical. Your position is wrong. That’s it. Small tweaks to saddle height, saddle fore-aft, or cleat angle resolve most cases. And the diagnostic trick is almost embarrassingly simple — pain location tells you what to fix. Front knee pain means one thing. Back knee pain means another. Side pain points somewhere else entirely. Know where it hurts, know what to adjust.
Pain at the Front of Your Knee — Saddle Is Too Low
Anterior knee pain — the grinding, aching kind you feel under or around the kneecap — almost always traces back to a saddle sitting too low on the seat tube. Low saddle means your quads carry the entire bottom of the pedal stroke. Your kneecap absorbs load it was never designed to absorb. By minute 30 or 45, the pain shows up like clockwork.
Here’s how to check saddle height using the heel-on-pedal method — at least if you want a reliable baseline across multiple bikes, which I’ve used on three different setups with consistent results:
- Clip out and sit on your saddle in your normal riding position.
- Place your heel directly on the pedal at the bottom of the stroke — 6 o’clock position.
- Your leg should be almost fully extended. Maybe a 25-degree bend at the knee. Not rigid, not locked.
- Your hips shouldn’t rock side to side as you pedal through the stroke.
More bend than that at the bottom? Your saddle is too low. Raise it 2 to 3mm. Then ride easy for 20 to 30 minutes and honestly assess the pain. Still there? Another 2 to 3mm. Most front knee pain clears after a total rise somewhere between 5 and 10mm. Small increments matter here — raising too aggressively creates the opposite problem, posterior pain, which I’ll get to in a moment.
If you’ve dialed the saddle height correctly and the front knee pain is hanging around, look at your cleats next. A cleat positioned too far back toward your heel forces your quads to grind harder through the full stroke. Try sliding your cleats forward 2 to 3mm relative to the ball of your foot. One easy 30-minute test ride usually tells you whether that’s the fix.
Pain at the Back of Your Knee — Saddle Is Too High
Probably should have opened with this section, honestly. Posterior knee pain is the overextension problem — saddle too high, leg reaching too far at the bottom of the rotation, hamstring and calf working overtime to compensate.
I made this exact mistake on my gravel bike. I’m apparently someone who reads fit recommendations online and implements them without testing incrementally, and a badly sourced saddle height suggestion worked great for that writer while it never worked for me. Raised the saddle, felt confident, hit mile 15 of a 40-mile ride, and my right knee went from a whisper to a scream. I turned around early. The fix was embarrassingly simple — I dropped the saddle 3mm that evening. Don’t make my mistake.
Use the same heel-on-pedal method, but this time you’re lowering in 2mm increments. That 25-degree bend at the bottom of the stroke is still your target. Not straight. Not deeply bent. A relaxed quarter-bend that doesn’t strain anything.
One thing worth checking before you touch the saddle at all: tight hamstrings can perfectly mimic posterior knee pain even when your saddle height is dialed. Sit on the floor, legs straight out. Try reaching your toes without bending at the knee. Can’t reach your ankles? Your hamstrings are almost certainly contributing. Spend a week stretching — 30 seconds, twice daily, both legs — then retest on the bike before making any saddle changes.
Saddle fore-aft position plays a role here too. A saddle pushed too far back relative to the bottom bracket makes your leg reach further forward and down through the stroke. That extra reach loads the back of the knee. Nudge the saddle forward 5 to 10mm and ride 20 minutes. Pain eases? You found part of the answer.
Pain on the Outside or Inside of Your Knee — Cleat Alignment
But what is cleat float? In essence, it’s the rotational movement your foot can make while still clipped into the pedal. But it’s much more than that — it’s the mechanism that lets your knee find its natural tracking pattern rather than being locked into a position your anatomy doesn’t match.
Zero-float cleats hold your foot completely rigid. Six-degree float cleats — something like the Shimano SPD-SL yellow cleats — let your foot rotate 6 degrees inward or outward before releasing. That rotational freedom matters because knees want to track in a straight line over your feet. Float gives your body room to find that line. Lock your feet rigid with the wrong cleat angle? Your knee goes wherever the cleat points it.
That’s what makes cleat angle so important to us cyclists dealing with lateral or medial pain. Outside knee pain — often blamed on IT band friction — and inside knee pain both trace back to the same root: your cleat rotation is pulling your knee out of its natural path. Toe angled too far inward, knee gets dragged inward, medial pain follows. Toe angled too far outward, knee gets dragged outward, lateral pain follows. So, without further ado, let’s dive in.
Start at neutral — toe pointing straight ahead, matching how you stand naturally. Photograph your current cleat position before touching anything. Then rotate the cleat 2 degrees outward, away from the bike’s centerline. That’s the position that works for most riders. Ride easy for 20 to 30 minutes. Improving? You found it. Still hurting? Try 4 degrees outward. Getting worse? Back to neutral, or try 2 degrees inward.
Q-factor — the distance between your pedals — occasionally contributes to side knee pain, but only after you’ve already sorted saddle height and cleat angle. If two full weeks of cleat testing haven’t resolved things, Q-factor might be worth investigating. That means swapping cranksets or pedals, which gets expensive fast. Try the cleat fix first. Almost always, that’s enough.
How to Test Your Adjustments Without Wrecking Your Ride
The protocol is simple: one change. One ride. One assessment.
Make a single adjustment — raise the saddle 3mm, for example. Ride 20 to 30 minutes at genuinely easy effort, the kind where you could hold a full conversation without gasping. After the ride, sit down and assess. Did the pain improve, hold steady, or worsen? Wait at least 24 hours before touching anything else. Your knees need actual time to respond to positional changes, not just one lap around the block.
Never change saddle height and cleat angle on the same day. I’ve watched riders do this, declare that nothing worked, and go buy expensive new pedals when really they just destroyed their own diagnostic process. You won’t know what helped or hurt if you change two variables simultaneously. One thing at a time.
Keep a log — a notebook, a notes app, whatever you’ll actually use. Record the date, what you changed, the exact measurement, and how the pain felt before and after each ride. This becomes your map through the process. It also saves you from accidentally undoing a fix you found three weeks ago because you forgot you’d made it.
One final line worth drawing clearly: sharp, sudden knee pain, pain accompanied by swelling, or pain that gets significantly worse mid-ride — stop immediately. That’s not a fit problem. That’s an injury. See a sports medicine doctor before you clip in again. Fit adjustments resolve mechanical pain caused by poor position. They don’t fix torn ligaments, damaged cartilage, or anything structural. Know the difference.
Stay in the loop
Get the latest adventure cycling world updates delivered to your inbox.