Why Your Chain Keeps Dropping
Dealing with a dropping chain has gotten complicated with all the conflicting advice flying around. As someone who has been cycling for fifteen years — road, gravel, mountain, the works — I learned everything there is to know about this specific problem. Today, I will share it all with you.
There are really only three culprits. Front derailleur limit screws out of spec. Chainring teeth worn into that classic shark-fin shape. Or a rear axle that’s gone loose and slacked the chain just enough to let it slip. That’s it. Ninety seconds of careful observation usually tells you which one you’re dealing with.
Chain age accelerates all three. A stretched chain — something we’ll get into later — multiplies damage across every component. You might nail the derailleur adjustment and still drop the chain because the chain itself has stretched past 0.75 percent, chewing up ring teeth and throwing off your limit screw math entirely.
The triage is straightforward. Watch where the chain actually falls. Drops to the inside of the front derailleur cage, toward the frame? That’s your limit screw. Drops intermittently mid-climb without any shifting involved? Bent or worn chainring. Rear wheel looking visibly loose or shifting sideways when you grab the seatstays? Rear axle. Simple as that.
How to Adjust Your Front Derailleur Limit Screws
Probably should have opened with this section, honestly. This is the fix that solves roughly seventy percent of dropping complaints — shops know it, experienced riders know it, and now you will too.
But what is a limit screw, exactly? In essence, it’s a small set screw that controls how far your derailleur cage can physically swing in either direction. But it’s much more than that — it’s the gatekeeper between a chain that stays on and one that decides to visit your bottom bracket every five miles.
Your front derailleur has two of them. The “L” screw governs the low limit — how far inboard the cage swings toward the frame. The “H” screw controls the high limit — outboard travel toward the big ring. Chain drops inboard? L screw backed off. Chain drops outboard? H screw is your problem.
While you won’t need a full workshop setup, you will need a handful of basic tools. A 1.5mm or 2mm Allen wrench, a bike stand, and about five minutes of focused attention. Shift onto the smallest front ring and largest rear cog. Spin the cranks by hand and look at the gap between the chain and the inner edge of the derailleur cage. You want 1-2mm of clearance. Not touching. Not half a centimeter away. One to two millimeters — that’s the window.
Chain rubbing or dropping inward? Turn the L screw clockwise in quarter-turn increments until you land in that range. Overdo it and the derailleur pulls away from the chain entirely, which looks completely fine until you actually shift and everything binds up. Don’t make my mistake.
Now shift to the biggest ring in front, smallest cog in back. Check the outer cage edge — same 1-2mm target. Chain dropping outward or the cage contacting the ring? Adjust the H screw. Clockwise moves the cage inward. Counterclockwise moves it out.
After both adjustments, run through all twelve or fourteen gears while pedaling gently. No grinding. No hesitation. No drops. Still dropping under load or during a specific gear combo? Time to look at the chainring.
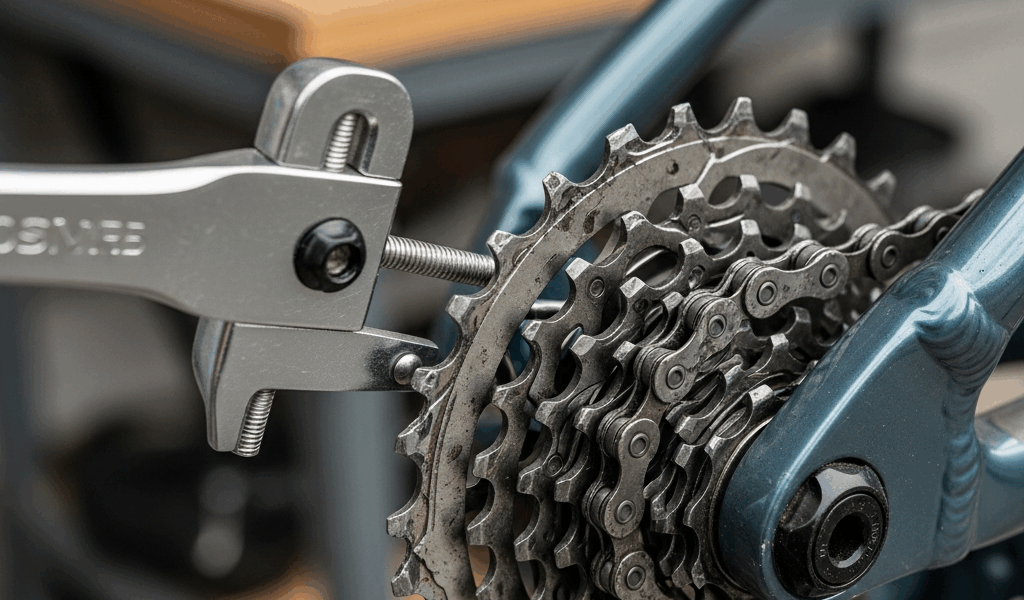
Checking for a Worn or Bent Chainring
Worn chainring teeth develop a shark-fin profile. The leading edge of each tooth slopes backward — looks exactly like a dorsal fin if you know what you’re looking for. A fresh ring has teeth that are relatively symmetrical and perpendicular to the ring face. A worn one looks like someone filed them at a deliberate angle.
First, you should inspect this by hand — at least if you want a reliable read on the situation. Remove the crank arm or just spin the pedals backward slowly and examine the teeth in profile under direct sunlight when possible. Run your thumb carefully across them and you’ll feel the asymmetry immediately. Worn rings catch the chain unpredictably because the teeth simply can’t grip the rollers with any consistency.
Bent rings behave differently. They cause intermittent drops that usually happen at one specific point in the pedal rotation. Spin the crank slowly and watch the chain. Stays put one revolution, drops the next? That’s a bent ring talking. Watch the gap between the chain and ring as you turn — if it widens and narrows at one specific point, the ring is out of true.
How long does a chainring actually last? I’m apparently a moderate-mileage rider doing 50-80 miles a week on mixed gravel terrain, and a quality ring works for me for somewhere between 8,000 and 12,000 miles before shark-fin wear gets serious. Mountain terrain chews through them faster. Smooth pavement and lighter riders can stretch that toward 15,000 miles. Replacement rings run $40 to $120 depending on the spec — a Shimano 105 inner ring is around $45, an Absolute Black oval for gravel will run you closer to $90.
Worn rings need replacement. Full stop. You can’t file them back into serviceable shape. A bent ring can sometimes be straightened by a shop mechanic, but honestly, replacement is the right move unless the ring is nearly new and the bend just happened.
Fixing a Loose Rear Dropout or Quick Release
This one caught me completely off guard years ago. Frustrated by a chain that dropped on every other climb, I fussed with my derailleur for forty solid minutes before a mechanic at my local shop — a guy named Marcus who had been wrenching since the mid-90s — pointed wordlessly at my rear axle. Slightly loose. That was it.
Any axle play allows the wheel to shift backward in the dropout just enough to slack the chain. Slack equals drops. That’s what makes a properly tensioned axle so critical — and that’s what makes this problem endearing to us gravel riders who forget to check the basics before blaming the derailleur.
Running a quick-release? Grip the lever and feel the tension. It should require genuine, deliberate pressure to open and close, with distinct friction at the midpoint. If it flops open easily, tighten the adjustment nut on the opposite end with the lever closed. Quarter-turn clockwise, test, repeat. You want the lever to require firm thumb pressure and a noticeable resistance as it passes through the tight zone.
Thru-axles are simpler. Grab the lever or cap and turn by hand — it should be snug enough that you cannot wiggle the wheel side to side at all. Any play means it needs tightening.
After tightening, spin the wheel and confirm it stays centered in the chainstays. Spin the cranks and confirm the chain tracks properly.
Bent dropouts are a different beast entirely. A warped or cracked dropout means the wheel will never sit square regardless of how tight the axle is. That requires a shop visit for alignment or frame replacement — no home fix exists for that one.
When to Replace the Chain Instead of Adjusting
So, without further ado, let’s dive into the part most basic tutorials skip entirely: a stretched chain will cause drops even after perfect derailleur and chainring adjustments. Fix everything else flawlessly and still drop the chain on every climb? This is probably why.
Chain stretch is gradual. Rollers wear against the pin bushings, links develop microscopic play, and overall chain length increases across every single link. A stretched chain sits lower on the teeth, won’t engage properly with the derailleur pulleys, and pulls chainring teeth in ways that accelerate wear aggressively.
A chain checker might be the best option here, as diagnosing stretch requires actually measuring it. That is because eyeballing a stretched chain is nearly impossible — it looks completely normal until it doesn’t. These tools cost $10-$15. The Park Tool CC-3.2 is around $12 and has been in my kit for years. Hang it on a link somewhere in the middle of the chain under tension and press down. Slides into the 0.75 percent mark? Replace the chain now. Reaches 1.0 percent? That’s urgent. Beyond that threshold, every pedal stroke is actively destroying the cassette and chainring — components that cost significantly more than a $25 chain.
I’m apparently someone who forgets to check chain wear until something drops, and the Park tool works for me while eyeballing the chain never does. Fresh chain, properly sized and installed, resolves drops caused by stretch alone. Combined with a derailleur adjustment, it’s often the complete and permanent cure.


Stay in the loop
Get the latest adventure cycling world updates delivered to your inbox.