Bottom Bracket Creaking When Pedaling — How to Fix It
Bottom bracket creaking when pedaling is one of the most maddening problems in cycling. I’ve spent probably hundreds of hours over the years chasing creaks on customer bikes, my own bikes, friends’ bikes they’ve wheeled into my garage with that specific defeated look on their face. And the number one mistake I see — the one I made myself early on — is pulling the bottom bracket out first and asking questions later. Nine times out of ten, the creak isn’t even coming from the bottom bracket. It’s coming from somewhere else entirely, somewhere that sounds exactly like the bottom bracket but isn’t.
This article is a diagnostic first, a repair guide second. Work through it in order and you’ll find your creak faster, spend less money, and avoid the specific misery of reinstalling a freshly greased BB only to hear that same tick-tick-tick the moment you hit the first climb.
It Might Not Be Your Bottom Bracket
Probably should have opened with this section, honestly. The bottom bracket gets blamed for almost every creak that happens below the saddle, and the logic seems sound — it’s a bearing, it moves, it’s under load. But several other contact points on a bike transmit vibration into the same part of the frame, making them acoustically indistinguishable from a failing BB.
Here’s the thing about bike creaks: they follow load, not location. A noise that appears when you pedal hard and disappears when you spin easy is almost certainly driven by torque somewhere in the drivetrain interface — not necessarily the BB itself.
Pedals First — Always Pedals First
Grab a 15mm pedal wrench and check your pedal thread engagement right now, before you do anything else. Loose pedals creak. Dry pedal threads creak. I had a customer’s Trek Domane come in with an infuriating creak that three other shops had attributed to the BB. Twenty minutes with a pedal wrench and some Finish Line grease and it was gone. Two years of creak, solved for free.
Pull the pedals out, clean the threads on both the pedal spindle and the crank arm, apply a thin layer of grease (copper-based anti-seize works well here, especially for aluminum threads), and torque them back in. Left pedal is reverse-thread — 12 to 15 Nm is plenty, though I usually go feel-based on pedals and just get them snug-plus-a-quarter-turn. Test ride immediately before moving on.
The Seatpost — The Classic Impostor
A dry seatpost clamp makes a creak that you would swear on a stack of Bibles is coming from the BB. It happens under load, it happens at the same cadence, it disappears when you stand up — wait, actually that’s the tell. If the creak disappears or changes character when you stand up and get off the saddle, your seatpost is the prime suspect.
Pull the post out. Clean the inside of the seat tube. Regrease the post (carbon posts need carbon assembly paste, not grease — this matters). Check the clamp bolt, make sure it’s hitting the right torque spec for your post diameter. Reinstall. A lot of seatpost creaks on carbon frames come from the post micro-moving inside a dry tube, and the sound travels straight down into the BB shell area.
Chainring Bolts and Crank Interface
Five chainring bolts. Each one is a potential creak source. They work loose over time, especially on bikes ridden hard. Use a 5mm hex and a chainring bolt tool to check each one — they need a countertorque tool to tighten properly, otherwise you’re just spinning the nut on the back side. Torque spec is typically 5 to 8 Nm depending on material.
While you’re in there, check the crank bolt itself. Shimano HollowTech II cranks use a pinch bolt system — those pinch bolts are tiny and they do back out. Torx T30 on most Shimano cranksets. SRAM DUB uses a 22mm or 8mm hex preload. Check the spec for your specific crank and hit it.
The Headset — Surprisingly Common
Integrated headsets creak. Threaded headsets creak. The vibration travels through the steerer tube and sounds — from inside the cockpit — like it’s coming from somewhere in the middle of the bike. The test is simple: replicate the creak standing still by putting the front brake on hard and rocking the bike fore-aft under load. If you can reproduce it that way, it’s the headset or front end, not the BB. Clean the headset races, regrease, and check the preload cap.
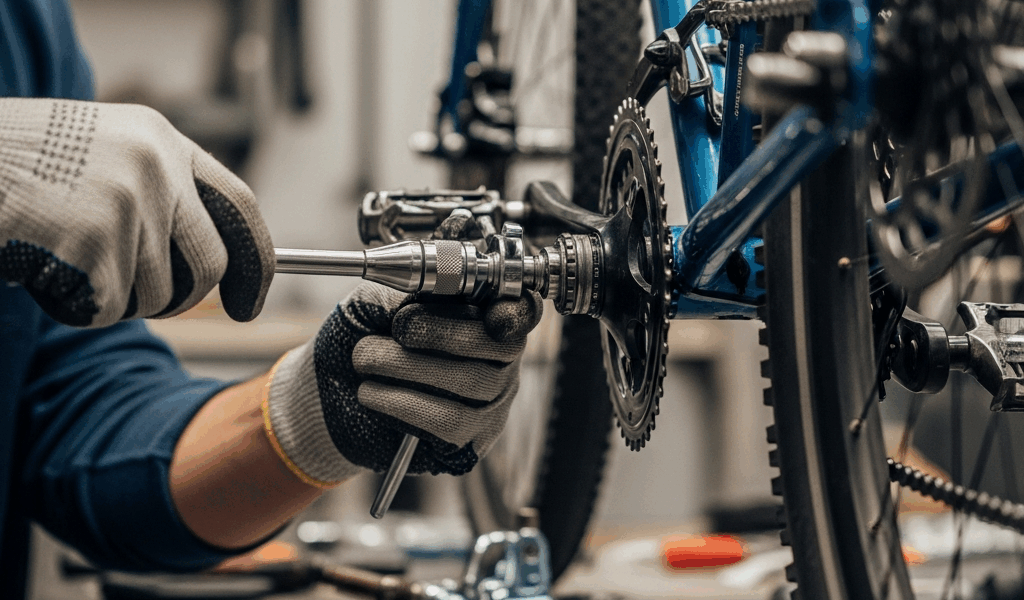
Threaded BB Fix — Clean Grease Retorque
If you’ve eliminated pedals, seatpost, chainring bolts, and headset, and the creak persists — now we look at the BB. Threaded bottom brackets are the good news scenario. They’re relatively easy to service and, critically, they’re easy to remove and reinstall without special tools beyond a BB cup wrench.
The most common threaded standard you’ll encounter is BSA (British Standard Asymmetric, also called English thread). It’s 68mm or 73mm shell width, 1.37″ x 24 TPI threads. Left cup is right-hand thread, right cup is left-hand thread — meaning it tightens counter-clockwise. This trips people up. The right cup is a left-hand thread because it tightens against the direction of pedaling force, which keeps it from self-loosening.
The Procedure
You need a BB cup wrench — the Park Tool BBT-32 fits most external bearing cups and it’s about $25. You also need either a torque wrench or a lot of experience knowing what 40 Nm feels like.
- Remove the cranks. HollowTech II uses the Shimano crank removal tool (TL-FC16 or similar) to back out the plastic preload cap, then the pinch bolts come out and the non-drive crank pulls off.
- Remove the BB cups with the BBT-32. The drive-side cup is left-hand thread — turn clockwise to loosen.
- Clean the frame threads completely. Use a rag first, then isopropyl alcohol on a cotton swab. Get every groove. Frame thread contamination is the most overlooked step.
- Inspect the threads for damage. Cross-threaded or stripped threads need a tap and die set or a shop with an M33 tap, not a home repair.
- Apply fresh grease — I use Park Tool PPL-1 or Phil Wood Waterproof Grease, a moderate layer covering all thread surfaces. Don’t be stingy but don’t glob it.
- Thread the cups in by hand first to confirm they’re engaging cleanly, then torque to 35 to 50 Nm. Shimano specifies 35 to 50 Nm for their BSA BBs. Hit the middle — 42 to 45 Nm is where I usually land.
- Reinstall cranks and test.
Worn out threaded BBs can creak no matter how well you prep the threads. If the bearing feels rough when you spin it by hand — a gravelly, notchy resistance — the cups are done. Shimano Ultegra SM-BBR60 runs about $35 and is the benchmark for BSA external bearing replacement. The Shimano 105 RS500 is essentially the same bearing for a few dollars less.
Press-Fit BB — The Notorious Creaker
Press-fit bottom brackets are genuinely contentious in the cycling world, and they’ve earned it. The concept is that the BB cups press directly into the frame shell without threads, saving a few grams and making the frame slightly easier to manufacture. In practice, they creak. They creak when new. They creak after service. Some of them creak forever.
The standards are chaotic. PF30 uses a 46mm ID shell with 30mm spindle cranks. BB86 (also called PF86 or Shimano PF) uses a 41mm ID shell with 24mm spindle cranks. BB92 is the mountain bike version of BB86 in a wider shell. BB386EVO tried to be universal and mostly just confused everyone. If you don’t know what you have, measure the shell ID with digital calipers.
Why Press-Fit Creaks
The cups sit in the frame shell under interference fit — the cup is slightly larger than the hole, so it compresses in and holds through friction. The problem is that carbon fiber and aluminum don’t maintain that interference fit perfectly under real-world load cycles. The cup micro-moves. That micro-movement is your creak.
Grease makes this worse. Grease reduces friction, which is exactly what you don’t want in a press-fit interface. The correct product here is a retaining compound — Loctite 609 is the industry standard and it’s specifically designed for cylindrical press-fit joints. A bottle runs about $18 to $22 and lasts for years.
Press-Fit Service Procedure
Press-fit removal requires a proper removal tool — you can use a generic bearing press kit with the right adapters, or the Park Tool BBP-1 press, or in a pinch a homemade threaded rod setup. Don’t hammer them out directly. You can damage the shell.
- Remove cranks. Remove old BB cups using the appropriate removal tool.
- Clean the shell bore thoroughly. Isopropyl alcohol, cotton swabs, get all the old retaining compound or grease residue out. The shell needs to be clean and dry for the Loctite to work.
- Inspect the shell bore for damage or scoring. Deep scoring in the shell means the interference fit is compromised — some frames need a threaded conversion insert at this point (Wheels Manufacturing makes excellent threaded inserts for most press-fit standards, around $55 to $80).
- Apply Loctite 609 to the outer surface of the BB cups — a thin, even film around the circumference. Also apply a thin layer to the shell bore.
- Press the cups in squarely using the press tool. Misalignment during pressing is a creak waiting to happen.
- Let the Loctite cure for at least 30 minutes before installing cranks and riding. Full cure is 24 hours, but 30 minutes gets you to enough initial strength for installation.
Frustrated by recurring press-fit creaks on a customer’s 2019 Specialized Tarmac SL6, I eventually installed a Wheels Manufacturing threaded conversion — essentially a sleeve that threads into the frame and gives you a BSA interface — and the bike has been silent for two seasons since. Sometimes the conversion is the right call, not a defeat.
The T47 Standard
Newer frames are starting to adopt T47, which is a threaded BB standard with the same 46mm shell diameter as PF30 but with actual threads. It’s press-fit-sized but threaded — best of both worlds on paper. If your frame has it, count yourself lucky and treat it exactly like a BSA threaded BB.
When to Replace Instead of Fix
Cleaning and regreasing a BB is worth doing once. Maybe twice on an older bike with a nicer bearing cup. But bearings wear out, and there’s a point where service stops making sense.
The Bearing Feel Test
With the cranks removed, spin the BB spindle by hand. Good bearings feel smooth with a slight dampness to the rotation — that’s the grease doing its job. Bad bearings feel notchy, gravelly, or rough in a way that catches at specific points. Some bearings get a rumbling quality under load that you can feel through the spindle even without cranks attached.
Apply light lateral pressure to the spindle while spinning. Any side-to-side play — any movement at all perpendicular to the spindle axis — means the bearing is worn beyond service. Replace it.
Lifespan by Type
Shimano cup-and-cone external bearings like the BBR60 are surprisingly durable if kept greased. I’ve gotten four to five years on a commuter bike out of a single set of cups. Press-fit bearings tend to wear faster because they’re smaller and harder to seal against contamination. Ceramic bearings from brands like Kogel or Ceramicspeed are genuinely longer-lasting than steel, not just a marketing claim — but they run $120 to $300 and don’t make sense on every bike.
Signs a replacement is overdue: any roughness that persists after fresh grease, lateral play in the spindle, or a creak that comes back within a few rides of a full service. The BB itself isn’t expensive on most builds. A new Shimano threaded BB is $25 to $40. Spending an afternoon re-servicing a dead bearing isn’t frugality — it’s delay.
One More Thing
If you’ve replaced the BB, regreased the pedals, serviced the seatpost, checked the chainring bolts, and the creak is still there — check your shoes. Cleats work loose. Cleat bolts dry out. A creaking cleat-to-pedal interface happens at exactly the same cadence as a BB creak and it will make you feel like you’re going insane. Three-bolt SPD-SL cleats especially. Put some grease under the cleat plate before you reinstall and check those M5 bolts. It’s embarrassing how often that’s the answer.


Stay in the loop
Get the latest adventure cycling world updates delivered to your inbox.