Why Your Front Derailleur Won’t Shift Into the Big Ring
Front derailleur troubleshooting has gotten complicated with all the conflicting advice flying around. As someone who has spent years diagnosing shifting problems mid-ride — usually at the worst possible moment — I’ve learned everything there is to know about this particular headache. Today, I will share it all with you.
Here’s the thing most guides skip: this problem is almost always fixable in ten minutes with no special tools. I’ve been stuck on the small chainring halfway up a climb, cursing at my handlebars, only to discover the fix took thirty seconds. Front derailleur issues get ignored in favor of rear derailleur drama, which means you’re probably reading one of the few articles that actually covers this properly.
Three things cause this failure mode. Low cable tension is the culprit roughly 70% of the time. The high limit screw — called the H screw — sitting too tight blocks upward movement in a big chunk of remaining cases. Cage misalignment, either height or angle, rounds out the trio. Spend thirty seconds diagnosing before you touch anything. Push the cage manually toward the big ring. Does it move freely? Cable tension is probably your issue. Does it hit a hard stop partway through? That’s the H screw. Does the whole thing sit crooked or too far from the rings? Alignment problem.
Check Cable Tension First Before Anything Else
Cable tension is where you start. Not because it’s always the answer, but because it’s the safest thing to test and the fastest to rule out.
Shift down to the small ring. Look at the cage from the side, then grab the shift cable — the actual metal strand running from your shifter down to the derailleur — and pull it gently toward you. The cage should nudge toward the big ring. That’s tension doing its job. If the cage barely moves, your cable is slack. Limp as a noodle, honestly.
Now find the barrel adjuster. It’s the threaded collar on the cable housing, usually sitting right near the derailleur. Turn it counterclockwise — away from the derailleur — by a quarter turn. Try shifting up. Nothing? Another quarter turn. Most people find the sweet spot within two to four adjustments. It’s almost anticlimactic how often this works.
Success looks like this: the cage moves smoothly toward the big ring, the chain actually climbs onto the larger chainring, and there’s no grinding or hesitation. You’ll feel it engage cleanly when it’s right.
Probably should have mentioned this earlier — I spent years adjusting cable tension without testing it by hand first. One day I grabbed the cable, realized it had zero resistance, and saved myself ten minutes of guessing. Don’t make my mistake. Do that step first, every time.
If you’ve added tension and the cage moves but the chain still won’t climb, the problem lives somewhere else. But if turning the barrel adjuster is actually creating slack — you’ll see the cage pull back toward the small ring — you’ve hit a different wall. The cable itself might be frayed or stretched past the point of usefulness. A frayed cable won’t grip properly regardless of how much tension you dial in. Look for visible damage: separating strands, kinks, crushed sections anywhere along the housing. If you see any of that, replacement is cheaper than frustration. A new Shimano shift cable runs about $8–12 at most shops and takes fifteen minutes to swap.
How to Adjust the High Limit Screw on a Front Derailleur
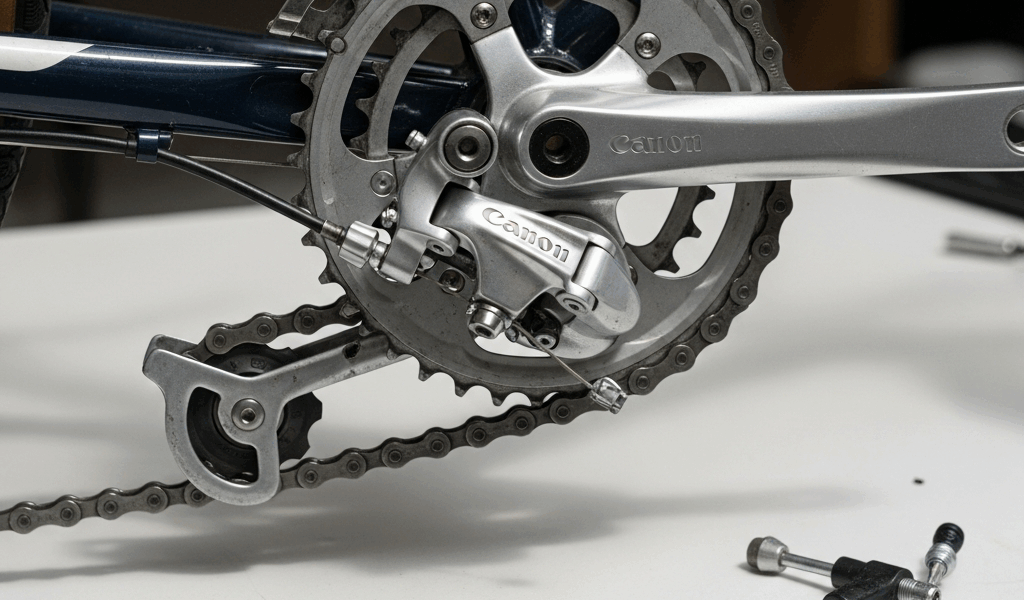
But what is the H screw? In essence, it’s a mechanical wall that prevents the cage from traveling too far toward the big ring. But it’s much more than that — when it’s over-tightened, it stops the cage from reaching the chainring entirely. That’s what makes it such a sneaky culprit.
Find the H screw on top of the derailleur body. It should be labeled. Don’t confuse it with the L screw, which sits lower on the housing and controls the opposite direction. Easy memory trick: H is high, L is low. That’s it.
Grab an Allen key that fits — most front derailleurs use 2mm or 2.5mm, though some older Shimano units take a flat-head screwdriver. Turn the H screw counterclockwise slowly. One full rotation, then test your shifting. Still stuck? Another half turn. The cage should now travel toward the big ring without hitting that mechanical resistance you felt before.
You’ll know the adjustment is right when the cage sits approximately 1mm from the big ring teeth at rest. No feeler gauge? A credit card is almost exactly 1mm thick. — at least if you want a quick reference that’s always in your pocket. The cage needs to be close enough to guide the chain up but not so close it rubs against the ring under hard pedaling load.
If the H screw is already loose and the cage still won’t move, cable tension is your real problem. Circle back to that section.
Fix Derailleur Cage Height and Angle If It Still Won’t Shift
Probably should have opened with this section, honestly. Cage alignment sounds intimidating until you realize you’re checking exactly two things: how high the cage hovers above the big ring, and whether it’s parallel to the chainring or slightly twisted.
Height first. The cage should sit 1–3mm above the tallest tooth on the big ring. Too high and the chain can’t find it on an upshift. Too low and you’ll get contact under pedaling load. Use a ruler or a feeler gauge — I’m apparently a feeler gauge person, and a basic Starrett set works for me while eyeballing it never quite does. If your clearance is way off, the derailleur clamp bolt needs attention.
Loosen the bolt clamping the derailleur to the seat tube. Most bikes use a 5mm or 6mm Allen key here — my Trek uses 5mm, for reference. Don’t remove the bolt entirely. Loosen it just enough to slide the derailleur body up or down by hand. Find that 1–3mm window, then retighten firmly. Not gorilla-tight. Firm.
Angle check comes next. Crouch behind the bike and look along the chain line toward the derailleur. The cage should be parallel to the chainring face. If it’s twisted — one edge sitting closer than the other — it’ll bind during every upshift. Loosen the clamp bolt again, rotate the derailleur body until the cage lines up with the ring, and retighten.
That’s what makes alignment so endearing to us home mechanics — it looks complicated and fixes in about four minutes. Run through your shifting after these adjustments. The chain should slip onto the big ring without drama.
When to Give Up and Replace the Front Derailleur
While you won’t need a full workshop setup, you will need a handful of minutes and honest eyes to assess whether your derailleur is actually done. Replacement is rare. Most “broken” derailleurs are misadjusted ones.
But sometimes you hit the actual wall. Look for cracks in the cage itself — a cracked cage won’t hold alignment no matter what you do to it. Check whether the limit screw threads are stripped. If the screw spins without catching, adjustment becomes impossible. That was the end of my 2019 Shimano Acera derailleur. Bent pivots or a twisted body that won’t straighten under hand pressure are also terminal. These aren’t user-repairable problems.
First, you should consider replacement if the derailleur has been through actual physical trauma — at least if the crash involved hard contact with rock, curb, or pavement. Troubleshooting a bent derailleur body is an exercise in frustration. A mid-range front derailleur — Shimano Altus M2000, SRAM Apex — runs $25–50 depending on where you shop and takes about twenty minutes to install.
Shimano might be the best option, as front shifting requires consistent cage geometry over time. That is because their manufacturing tolerances on the cage body tend to stay tighter through actual trail use than some budget alternatives. But honestly? Most front derailleurs outlast the bikes they’re bolted to when left alone. Yours probably just needs a cable tweak and three minutes of your attention.

Stay in the loop
Get the latest adventure cycling world updates delivered to your inbox.