Why Bike Brakes Squeak in the First Place
Bike brake squeaking has gotten complicated with all the bad advice flying around. As someone who managed a local repair shop for years, I learned everything there is to know about this particular problem. Today, I will share it all with you.
Three things make brakes scream: contamination, glazing, and misalignment. But what is contamination, exactly? In essence, it’s brake pads caked with dirt, oil, or metal shavings. But it’s much more than that — it’s the cumulative result of every wet road, every sandy trail, every chain-lube overspray you’ve ever ridden through. Glazing is different. Overheated pads develop a hard, slippery shell that won’t grip the rim properly. Both feel identical while you’re riding: the brakes technically work, but they sound like a tiny furious bird trapped somewhere inside your wheel.
Misalignment is the sneaky one. The pad doesn’t sit flush against the rim or rotor, creates a resonance, and squeaks on every single rotation. Fix the alignment first. Half the time, the squeak disappears without you ever touching the pads.
How to Tell What Kind of Brakes You Have
Identify your brake type before you touch anything. This matters — applying rim brake logic to disc brakes wastes an hour you genuinely didn’t have.
Rim brakes squeeze pads against the outer edge of your wheel. Two brake arms, pads on either side of the rim itself. Caliper, V-brake, cantilever — they all work the same way mechanically. If you see rubber pads pressing against the silver part of the wheel, that’s a rim brake.
Disc brakes use a rotor — a small metal disc bolted near the hub. The caliper clamps over it when you pull the lever. Hydraulic or mechanical, same principle. Not sure which you have? Look at the center of your wheel. Metal disc bolted there? Disc brakes. No disc? Rim brakes. That’s the whole test.
Fixing Squeaky Rim Brakes Step by Step
Probably should have opened with this section, honestly. Alignment is always my first stop with rim brakes — it’s free, takes two minutes, and fixes more squeaks than anything else on this list.
Step 1 — Check Pad Alignment
Spin the wheel slowly. Watch the pads. They should contact the rim evenly — same moment, same pressure, both sides. If one pad hits first or digs harder than the other, you’ve likely found your squeak right there.
Loosen the brake cable slightly. Most rim brakes have a barrel adjuster on the lever or the brake arm — unscrew it counterclockwise, maybe three full turns. Spin the wheel again. Adjust the brake arm at its pivot bolt until both pads sit parallel to the rim. Tighten the cable back up. Quick test spin. A lot of squeaks just stop here — no parts, no money, done.
Step 2 — Clean the Rim
Dirt, chain lube overspray, road grime — it all embeds into the rim’s braking surface over time. You can’t always see it, but it’s there.
Grab isopropyl alcohol — 70% works perfectly fine, costs about $4 a bottle at any drugstore — and a clean rag. Wipe down the entire braking surface on both sides. You want a matte finish when you’re done, not a shiny or oily residue. Keep wiping until the rag comes away clean. Dark streaks on the rag mean you found your problem. I’m apparently a wet-weather rider, and this step alone fixed my brakes three times last winter while my riding buddy’s degreaser spray never worked once. Don’t make his mistake.
Do this monthly if you ride in rain or on gravel. Most people skip it entirely, which is exactly why their brakes never stop squeaking.
Step 3 — Inspect and Replace Pads if Needed
Look closely at the pad surface. Glazed pads look smooth, almost lacquered — like someone buffed them with wax. Fresh pads have a slightly rough, porous texture you can feel with your thumbnail. If yours look glazed, cleaning won’t save them. They need to go.
Contaminated pads are even more obvious — dark staining, embedded grit, uneven wear patterns. Replace those too. Don’t try to salvage them.
A set of rim brake pads runs $8–15. Installation takes maybe five minutes. Two weeks of squeaking isn’t worth the $12 you’re saving.
A Note on Toe-In
Advanced rim brake tuning involves “toe-in” — angling the front edge of the pad so it contacts the rim a fraction of a second before the rear edge. That’s the gold standard for silence. It requires adjustable pad holders and a steady hand. If you’ve cleaned the rim, replaced pads, and the squeak stubbornly persists, toe-in is worth learning. Search YouTube — there are decent tutorials under five minutes. For now, the three steps above handle the vast majority of cases.
Fixing Squeaky Disc Brakes Step by Step
Disc brake squeaking frustrated me for years — probably 2017 through 2019, honestly — until I stopped treating it like a rim brake problem. The root causes are narrower. The fixes move faster once you stop looking in the wrong places.
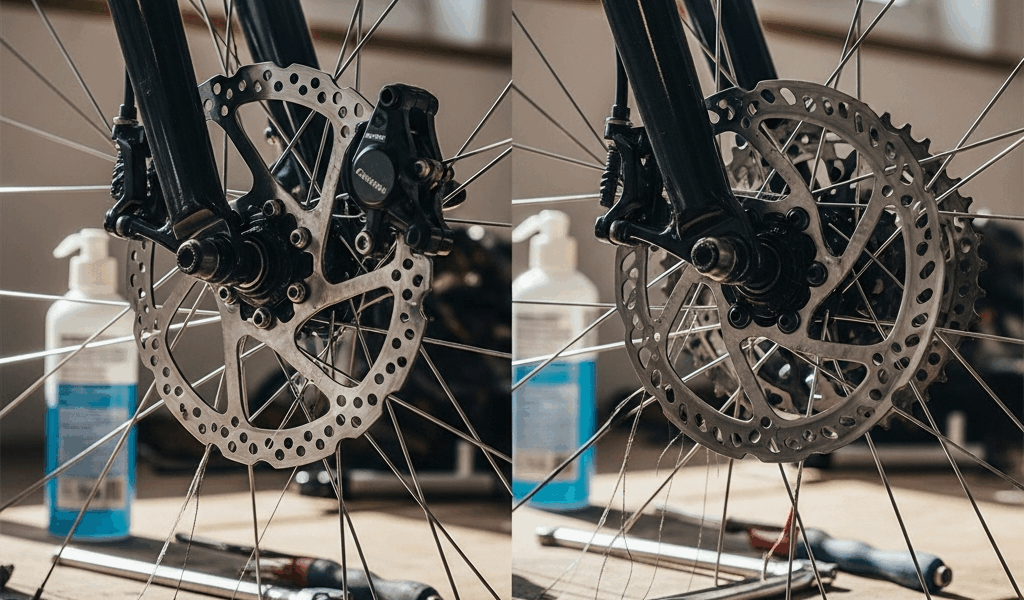
Step 1 — Clean the Rotor
Isopropyl alcohol, lint-free rag. Wipe both sides of the rotor thoroughly. Hold the rag against the rotor surface and spin the wheel slowly, letting the disc pass through the rag. Don’t touch the rotor with bare fingers afterward — skin oils recontaminate it almost immediately, and then you’re back to square one.
This single step fixes roughly 40% of squeaky disc brakes. Rotor contamination is often invisible to the naked eye but absolutely devastating for noise. It takes three minutes. Do it first, every time.
Step 2 — Diagnose Pad Contamination
Spin the wheel and listen carefully. Squeak that changes pitch or comes and goes usually points to the rotor or alignment. Constant, high-pitched, unwavering noise — that’s the pads.
Remove the wheel. Look through the caliper opening at the pad surfaces. Oil contamination shows up as a sheen or dark film. Dust contamination looks like gray or brown caking on the pad face. Neither of these cleans off reliably.
Contaminated disc pads almost always need replacement, not cleaning — the material is bonded to a metal backing plate and contamination penetrates deep into the compound. A pad set runs $15–35 depending on your brake model — Shimano MT200 pads run about $15 a set, SRAM Level pads closer to $25. Replace them. That’s the move.
Step 3 — Bed In New Pads
Fresh pads need bedding. This transfers a thin layer of pad material onto the rotor surface and creates the proper contact interface — without it, brakes feel wooden and sound awful for weeks.
Find an empty parking lot. Brake steadily for about 10 seconds from moderate speed, then coast for 30 seconds to let things cool down. Repeat that cycle 10 times. Your brakes will feel weak and noisy during this process. That’s normal. Avoid any hard panic stops while you’re doing it.
After bedding, the brakes should feel confident and settle into near-silence.
A Critical Warning About WD-40
Do not spray WD-40 anywhere near disc rotors or pads. I’ve watched this mistake play out dozens of times in the shop — someone hears a squeak, grabs the blue-and-yellow can, and absolutely destroys their brake system. WD-40 is a penetrating oil. It coats the rotor, soaks into the pads, and makes everything dramatically squeakier. You’ll spend the following week regretting approximately eight seconds of decision-making.
Isopropyl alcohol only. That’s the whole list.
When the Squeak Keeps Coming Back
You’ve cleaned everything, aligned everything, replaced the pads. Still squeaking. At this point the problem is mechanical — something needs replacement, not adjustment.
Worn pads beyond useful life. Pads thinner than 1mm are finished. New ones cost less than enduring another week of the noise. Check pad thickness first — it takes thirty seconds.
Warped rotors. Spin the wheel and watch the rotor edge. Visible wobble means it’s warped. Replacement is cheaper and faster than truing a disc — a replacement 160mm rotor runs about $20–30 for most standard sizes.
Loose brake mounts. Rock the caliper side to side with your hand. Any movement at all means the mounting bolts need tightening. A loose caliper resonates against everything around it and creates a squeak that mimics pad noise almost perfectly.
If none of those apply, the brake system needs hands-on assessment from someone who can physically look at it. Some problems genuinely can’t be diagnosed from a description. That’s what makes a good shop endearing to us riders — sometimes you just need a second set of eyes on the actual bike.
So, without further ado — run through this diagnosis in order, be systematic about it, and you’ll have quiet brakes. More importantly, you’ll know exactly how to keep them that way.

Stay in the loop
Get the latest adventure cycling world updates delivered to your inbox.