How to Know Your Brake Pads Are Actually Done
Brake pad wear has gotten complicated with all the conflicting advice flying around — forums saying one thing, YouTube mechanics saying another. As someone who spent three full riding seasons ignoring a faint grinding noise before finally pulling my rim brakes apart, I learned everything there is to know about when pads are finished. Today, I will share it all with you.
The frustrating part? You probably already know something’s wrong. You just haven’t paid attention yet.
There are three signals. None of them are subtle once you know what to look for.
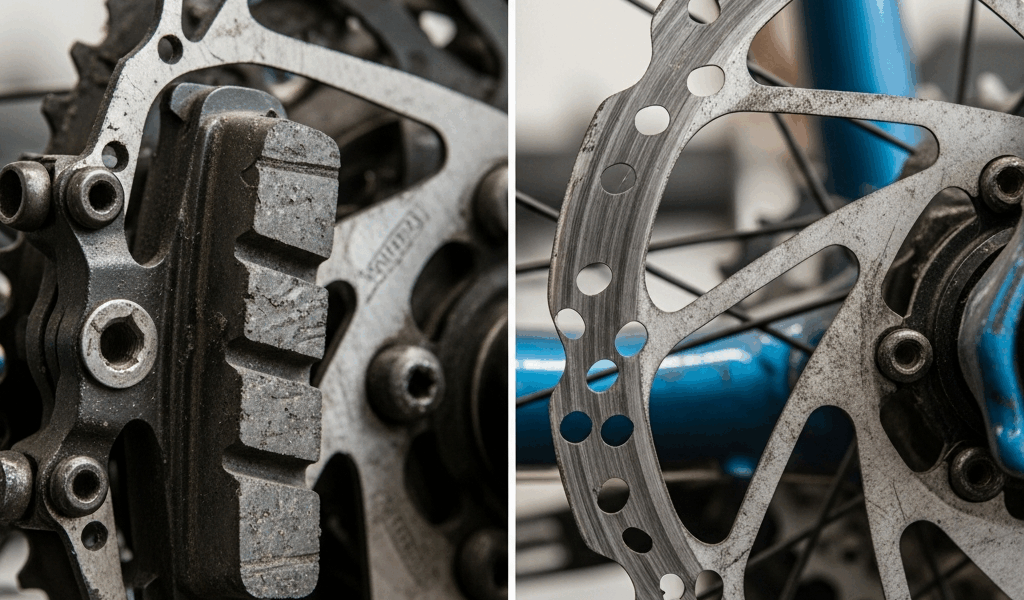
The first is noise — that dry grinding or high-pitched squeal mid-brake. Not always a death sentence. Contaminated pads squeal too. But if the sound is coarse and metallic, your friction compound is gone. You’re hearing pad backing scrape against rim or rotor. That’s your hard stop.
The second signal is feel. Your lever travels further before anything happens. You’re squeezing harder to match the stopping power you used to get effortlessly. On a long descent, everything goes mushy. Less material means less friction. Simple as that.
The third is visual. But what is a wear indicator groove? In essence, it’s a shallow channel machined down the center of the pad face. But it’s much more than a cosmetic detail — it’s your replacement threshold made visible. Kool-Stop and Shimano pads both use them. When the groove disappears, the pad is done. That’s the rule.
Measuring Disc Pads vs. Rim Pads
Disc pad thickness is a millimeter game. Grab a digital caliper — a Neiko 01407A runs about $12 on Amazon and has served me well — and measure the compound layer against the metal backing. Below 1mm on organic pads, you replace them. Full stop. Sintered pads last longer but wear harder and glaze when overheated. Glazed pads lose bite fast. They’ll eventually burn the glaze off on their own, but you’d rather not find out about glazing mid-descent.
For rim pads, the groove-gone rule works in most cases. But there’s a field test I fall back on when lighting is bad and I can’t see the wear line clearly. Squeeze the lever as hard as you can with the bike stationary. A spongy, distant feel — where braking seems to kick in late — means worn pads and compressed residual air. Fresh pads bite immediately. That difference in feel is hard to describe until you’ve experienced both back to back.
Rim Brake Pads — How to Remove and Replace Them
Probably should have opened with this section, honestly. I made a classic mistake installing rim pads on my fixed-gear commuter — a 2018 Pake Rum Runner — and didn’t account for toe-in. Two weeks of maddening noise followed. Don’t make my mistake.
- Loosen the pad bolt by a few turns — don’t remove it entirely. It sits on the caliper arm, threaded into the pad holder. A 2.5mm Allen key handles most Shimano and SRAM calipers. Cantilever systems sometimes use a slotted cartridge design instead. Loosen accordingly and don’t strip the threads by rushing.
- Slide out the old pad. Side-pull calipers usually let pads pull straight out. Cantilever designs sometimes require a slight rotation first. If it’s stuck, a thin flathead prying gently on the backing plate moves it without damage. Don’t force it.
- Clean the pad holder before anything goes back in. Sand, salt, dried mud — it all accumulates in there. I’m apparently obsessive about this step and a clean rag works for me while skipping it never does. Contaminated holders cause uneven wear and relentless squealing.
- Insert the new pad and thread the bolt finger-tight. Now set your toe-in. The leading edge of the pad — the part making first contact during braking — should touch the rim roughly 1–2mm before the trailing edge. A slight angle. Not parallel. Slip a business card behind the trailing edge as a spacer to visualize the gap clearly before tightening.
- Tighten fully and check alignment one more time. Spin the wheel, apply the brake gently, and listen for even contact on both sides. One pad rubbing while the other floats free means you need to loosen and re-toe.
- Check your barrel adjuster. If it’s wound fully inward, you’ve lost braking leverage before you’ve even left the driveway. Back it out a half-turn minimum. This step gets skipped constantly and it matters every single time.
Cartridge versus full-pad replacement — here’s the honest breakdown. Cartridge pads like Kool-Stop Dura-type ($14 a pair) let you swap only the compound, leaving the metal backing and bolt in place. Full pad replacement means everything comes out. Cartridges make sense if your brake arms are solid and well-maintained. Full replacement makes more sense if you genuinely don’t know how old your current setup is.
Disc Brake Pads — How to Remove and Replace Them
Disc brakes demand a different mindset entirely. Your rotor costs $40–$80 to replace. Your new pads are essentially fragile before bedding-in is complete. Contamination kills performance instantly — and I mean instantly, like within a single brake application.
- Remove the wheel and set it somewhere clean. Rotor contact with a greasy workbench or dirty hands causes problems that no amount of bedding-in fixes later.
- Push the pistons back before anything else. Mechanical systems include a pad spreader tool or release lever — usually in the box when you bought the brake. Hydraulic calipers need a flat-head screwdriver or the old pad used as a spreader. Press evenly from both sides. Uneven piston retraction creates alignment headaches that haunt you for weeks.
- Remove the old pads by unbolting the caliper from the frame or fork — though some systems let you access pads without full removal. Check your manual before assuming either way. While you’re in there, inspect the rotor and caliper bore for brake fluid residue. If you see it on a hydraulic system, you’ve got a seal leak. New pads won’t solve that. Address the leak first.
- Install new pads with clean hands — or better, nitrile gloves. Skin oils contaminate organic compound. The squeal that follows won’t bed out. Some riders hit new pads lightly with isopropyl alcohol to strip factory dust before installation. Slip them in, reattach the caliper, and torque bolts to spec. Most road and mountain disc calipers sit between 20–25 Nm. Use a torque wrench — guessing here is how frames get damaged.
- Bed in your new pads. That’s what makes this step endearing to us disc brake riders — it’s the difference between brakes that work and brakes that inspire confidence. Find a safe hill or empty parking lot. Ten moderate stops, gradually building heat. Ten harder stops. Then coast and let everything cool completely. You’re laying a transfer layer of pad material onto the rotor face — that layer creates the friction plateau. Skip bedding-in and your brakes squeal for 50 miles while it happens accidentally on its own.
- Bleed hydraulic systems only if needed. Most pad swaps don’t require it. Spongy lever feel after installation means air entered the line during the job. Bleed according to your manufacturer’s specs — SRAM, Shimano, and Magura all use different procedures and different fluids. Mixing them up is expensive.
Why Brake Pads Wear Out Faster Than They Should
- Wet and muddy riding grinds abrasive particles directly between pad and braking surface. Water simultaneously reduces friction, so you’re braking harder and longer to compensate. Rinse the bike within an hour of riding through mud. That hour matters.
- Poor pad alignment puts the braking load on one pad disproportionately. That pad wears in roughly half the time the other one does. Monthly toe-in checks for commuters catch this before it becomes expensive.
- Contaminated rotors and rims — fingerprints, spray lube overspray, cable grease — create a slippery film that reduces friction and forces harder braking. Isopropyl alcohol on a clean rag before long rides keeps braking surfaces honest.
- Temperature cycling causes hydraulic fluid to expand and contract, nudging pistons fractionally outward and slowly eating pad clearance over time. Storing your bike in a hot car trunk, then an overnight cold garage, stresses the system more than most riders realize. Stable storage makes a measurable difference.
Quick Check You Can Do Before Every Ride
Thirty seconds. That’s genuinely all this takes.
Squeeze each brake lever with two fingers. Firm and responsive? Good. Spin each wheel and listen for any rubbing. Glance at pad exposure — are you seeing metal backing, or is there still visible friction compound? If all three pass, you’re rolling. If something feels off, you’ve caught the problem before it becomes a roadside emergency or a safety incident at speed.
Catching worn pads early means a $14–$20 cartridge swap instead of an $80 rotor replacement. It means full stopping power exactly when you need it most — not 80% of it, not “good enough.” Do the thirty-second check before you roll out. Your future self — specifically the one descending a wet hill at 35 mph — will be genuinely grateful you did.


Stay in the loop
Get the latest adventure cycling world updates delivered to your inbox.