Why This Keeps Happening to You
Dealing with bike flats has gotten complicated with all the bad advice flying around. Replace the tube, ride fifty miles, flat again — I’ve been through that exact cycle more times than I care to admit. But here’s what finally clicked for me: rapid or repeated flats almost always trace back to one of five fixable problems. Most riders never actually diagnose the cause. They just swap tubes and hope. Today, I will share it all with you — every culprit, in the order you should check them.
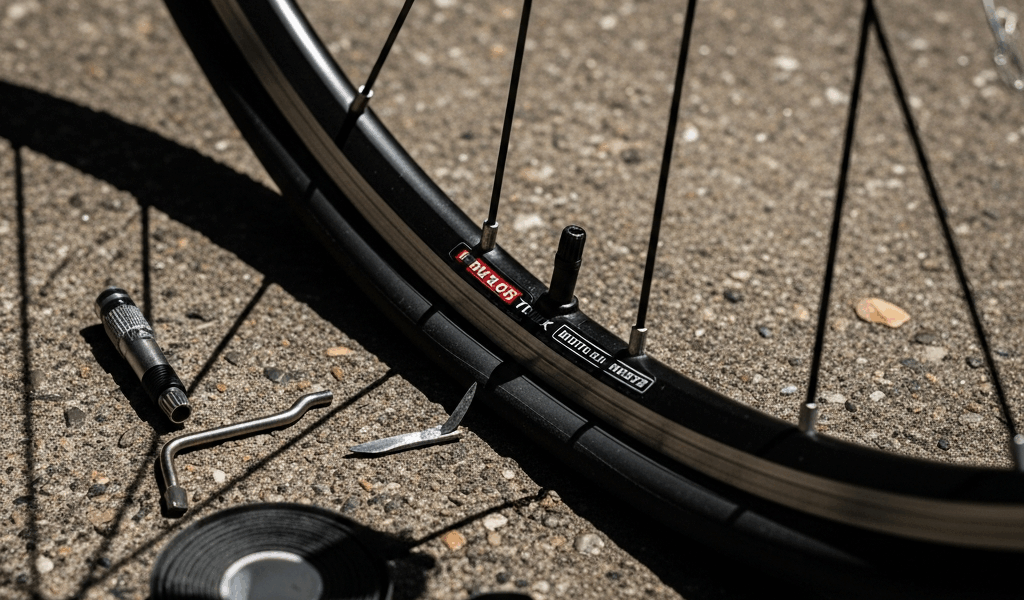
Check the Valve First
Start here. Seriously. The valve is the easiest thing to overlook and one of the most common reasons a tire goes soft overnight or dies within a few hours on the road.
But what is a valve failure, exactly? In essence, it’s a tiny air leak at the stem — slow enough that you don’t notice mid-ride, fast enough that your tire is dead by morning. But it’s much more than that. Both Presta and Schrader valves fail in different ways. A Presta valve has a small metal stem that screws down to seal things up. Loose stem, slow leak. Schrader valves — the car-tire style — can develop a bad seal inside the core itself. Same result.
Test it yourself with two methods. First, the spit test: lick your finger, press it against the valve stem for five seconds, watch for a bubble forming. Second, mix dish soap with water in a small spray bottle — nothing fancy, just a $2 bottle from the dollar store — and spray the stem. Bubbles mean air is escaping.
The fix is almost always free. For Presta valves, use the tiny wrench built into most floor pumps to tighten that metal stem counterclockwise. Snug, not violent. For Schrader valves, you may need to swap the valve core itself. A four-pack costs around three dollars at any bike shop or on Amazon.
Probably should have opened with this section, honestly. Most riders skip the valve entirely and go straight for a new tube — which fixes nothing if the valve is the actual problem.
Look for a Pinch Flat or Snake Bite
A pinch flat happens when tire pressure runs too low and you hit something hard — a curb, a pothole, a rock. The tire compresses fully, and the tube gets caught between tire and rim. That’s it. That’s the whole mechanism.
Here’s how to spot it: pull the tube out and look for two small holes sitting close together, usually parallel. They look exactly like a snakebite — which is, not surprisingly, what cyclists call them. If you see that pattern, low pressure is your problem. Not bad luck. Not a defective tube.
This is the most common thing I see with riders who run soft tires for comfort. I’m apparently a heavy-footed rider and Schwalbe Marathon tires work for me while ultralight road tubes never last more than a few rides. Pressure matters enormously:
- Road bike tires: 80–130 PSI depending on rider weight and tire model
- Gravel bike tires: 50–80 PSI
- Mountain bike tires: 25–35 PSI
Check the tire sidewall. It lists the pressure range right there, molded into the rubber. Running consistently at the low end of that range means one bad pothole will end your ride. Pump to recommended pressure before every ride — not every week, every ride. And if pinch flats keep happening even at proper pressure, check the rim for dents. A bent rim creates hard spots that chew through tubes.
Inspect the Rim Tape and Tire Bead
Rim tape is a thin plastic strip covering the spoke holes on the inside of your rim. When it shifts, tears, or lifts, spoke holes become exposed — and exposed spoke holes puncture tubes. You won’t see any of this from the outside. That’s what makes rim tape such a sneaky culprit for riders who can’t figure out why their tubes keep dying.
Remove the tire and tube. Look at the tape carefully. Good rim tape sits completely flat, no wrinkles, no gaps, every single spoke hole covered. Bad tape looks lifted at the edges, shifted sideways, or torn. If a spoke hole is visible anywhere, the tape needs to go. Replacement tape runs five to twelve dollars depending on rim width — Stan’s NoTubes tape in 25mm width is around $8 and lasts forever. Installation takes ten minutes: peel off the old tape, wipe the rim clean with a rag, run the new tape around pressing firmly as you go. No gaps. No air bubbles.
A related issue is tire bead seating. The bead is the stiff edge of the tire that locks into the rim groove. Inflate to 40 PSI and look all the way around where tire meets rim. Most tires have a thin line printed on the sidewall — that line should sit just barely above the rim edge, consistently, all the way around. If it dips below the rim in spots, the bead isn’t seated right and the tire can slip under pressure.
To fix it: fully deflate, work the tire back into position by hand, then inflate slowly while watching that bead line. It usually snaps into place on its own with a satisfying pop. Don’t make my mistake of inflating fast and assuming it seated correctly — check it visually every time.
When the Problem Is the Tire Itself
If you’ve ruled out the valve, pinch flats, and rim tape, the tire itself may simply be done. Frustrated by yet another flat with no obvious cause, I once spent forty minutes inspecting everything — only to find a piece of wire embedded so deep in the casing that it was nearly invisible. That was the culprit the whole time.
Run your finger slowly around the entire inside surface of the tire. Not quickly — slowly. A piece of glass, a wire fragment, or a thorn tip will catch your fingertip. I once missed a thin wire wrapped around the casing because I rushed through this step. New tube. Same flat. Ten miles later. Don’t make my mistake.
Also check the sidewalls. Splits, bulges, or visible cracking mean the tire is past its life — and that’s a safety issue, not just a performance issue. Tires don’t come with an official expiration date, but a heavily used tire at two to three years old is likely worn out regardless of how it looks on the surface. Mountain and gravel tires age faster than road tires. Bald spots, thin patches, or sidewall cracks mean it’s time for a replacement — something like a Continental GP5000 for road use or a Maxxis Minion DHF for trail riding will outlast most budget tires by a wide margin.
One more thing worth checking: tire-to-rim compatibility. A tire that’s too narrow or too wide for a given rim can seat incorrectly or slip under load. Your rim should have a width specification stamped or printed somewhere on the sidewall, and your tire’s stated width should fall within that range. Mismatched combinations cause problems that no amount of tube-swapping will fix.
Which Problem to Check First — A Quick Cheat Sheet
The timing of the flat tells you a lot. A tire that goes flat instantly after inflation — valve problem or a catastrophic pinch flat. A tire that’s dead by morning — almost always the valve. A tire that holds air fine but goes flat within a few miles of riding — rim tape or debris embedded in the casing. Work through checks in that order based on when the flat actually happens.
So, without further ado, let’s be direct: work through these five checks methodically and you will find the real problem. The answer is always there — fixable, specific, and usually cheaper to solve than buying yet another tube.

Stay in the loop
Get the latest adventure cycling world updates delivered to your inbox.