Why Your Gears Feel Sluggish or Imprecise
Bike shifting has gotten complicated with all the conflicting advice flying around. As someone who has pushed through mid-climb gear failures on a 2019 Specialized Allez with a Shimano 105 groupset, I learned everything there is to know about drivetrain troubleshooting. Today, I will share it all with you.
So, without further ado, let’s dive in.
But what is a shifting problem, really? In essence, it’s your drivetrain telling you something specific is off. But it’s much more than that. Sluggish shifts almost always trace back to two main culprits — cable tension and indexing misalignment. Cable tension first: your shift cable stretches over time. Normal wear. Not a defect. When it loses tension, the derailleur doesn’t travel far enough to seat the chain cleanly on each cog. Indexing misalignment is trickier. Even a millimeter of drift in derailleur position throws off the precise spacing required for crisp engagement. Then there’s the third possibility — housing deterioration. Cracked housing at the bends, frayed plastic liner, friction building invisibly. I found that one the hard way after 800 miles on original cables.
The good news? All three are fixable without touching your wallet for a new drivetrain.
Check Your Cable Tension First
Start here. Quickest diagnosis. Often the complete fix.
Shift into your middle chainring and middle cog — roughly the geographic center of your cassette. Now crouch behind the bike and look at the rear derailleur straight on. You want the guide pulley sitting directly underneath the cog you’re on. If it looks like it’s hovering between two cogs or sitting slightly off-center, cable tension is your problem.
Find the barrel adjuster — that threaded collar where the cable housing meets the derailleur body. Turn it counterclockwise in quarter-turn increments. After each quarter turn, run through a couple of shifts and listen hard. You’re listening for a single, snappy click followed by immediate chain engagement. Hesitation lasting more than one full pedal stroke means tension is still loose.
Probably should have opened with this section, honestly. Here’s the detail I wish someone had handed me before my first barrel adjuster attempt: sluggish upshifts toward smaller cogs mean you need more tension. Sluggish downshifts toward larger cogs mean you need less. I’m apparently a slower-than-average shifter and counterclockwise adjustments work for me while clockwise turns never solved anything in that direction. Don’t make my mistake of randomly spinning the adjuster both ways hoping something clicks.
Don’t crank the adjuster past two full rotations in either direction. Hit that limit with no improvement? Move on.
How to Re-Index Your Rear Derailleur
Indexing is where most riders get confused — at least if they haven’t done it once with their hands. Do it once and it stops feeling mysterious.
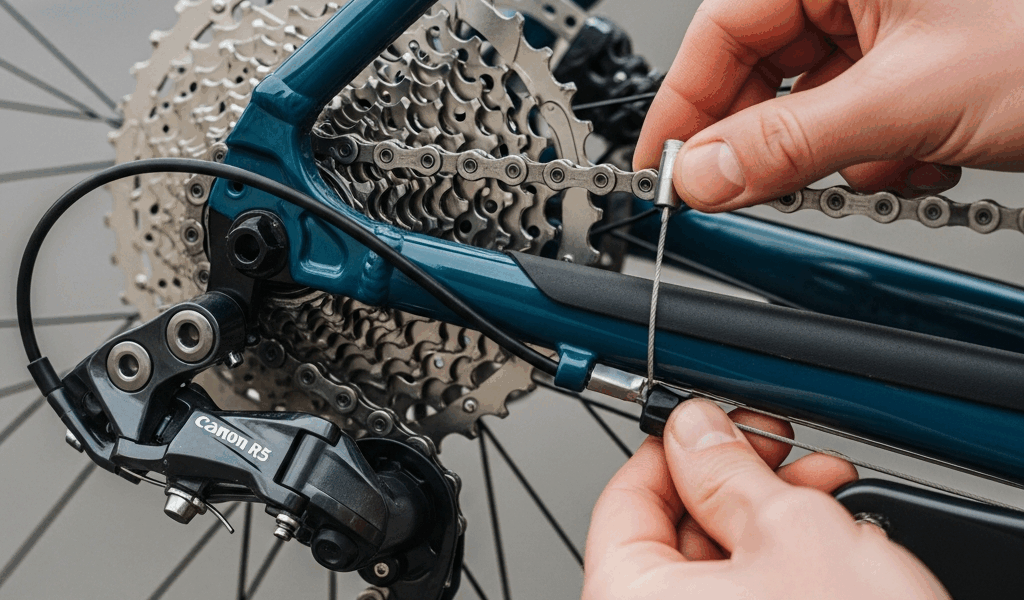
Shift the chain to the smallest cog. Easiest gear. The derailleur swings all the way right and stops. Good. Now find the cable anchor bolt on the back side of the derailleur cage — the bolt physically clamping your shift cable to the derailleur body. Loosen it until the cable is free. Using fingers or a basic cable puller, draw the cable snug. Not brutal. Just snug enough to feel light resistance. Retighten the anchor bolt while holding that tension. The derailleur should sit completely still afterward. If it moved, start over.
Here’s where indexing actually clicks into place: trigger your shifter up one gear. The chain should move cleanly onto the second-smallest cog with one click. One. If it overshoots or undershoots, reach for that barrel adjuster again. Small turns. Quarter turns only. Walk it up through every gear on the cassette — most 10- or 11-speed setups take under two minutes per side.
One thing that trips people up is the B-screw — the small screw on the derailleur cage controlling pulley angle. It matters for chain clearance, sure. But it’s rarely responsible for general sluggishness. Unless your chain is physically contacting the cage or the derailleur isn’t completing its full range of motion, leave the B-screw completely alone. Seriously. That’s a separate conversation.
When to Replace the Shift Cable Entirely
Barrel adjustment and re-indexing didn’t fully solve it? Your cable or housing is dying. Simple as that.
Pull the cable where it exits the shifter at the handlebar. Look at the tip. Fraying, discoloration, rust — any of those and this cable has run its course. Then trace the entire housing run from shifter to derailleur. Cracks in the plastic outer layer, separating sections, exposed cable visible at sharp bends — death sentences, every one. On a bike with three or more seasons of riding, this is almost expected.
Here’s a diagnostic trick worth keeping: if shifts improve immediately after adjustment but degrade noticeably within a few miles of riding, friction is accumulating inside the housing. That’s not a tension problem. That’s housing failure talking directly to you.
Cost reality check — a Shimano or Jagwire shift cable and housing kit runs $15–$25 at your local shop or online, assuming you already own cable cutters and a basic hex set. A shop visit for full cable replacement usually runs $40–$70, sometimes bundled into a drivetrain tune. While you won’t need a full professional tool kit, you will need a handful of basics: 4mm and 5mm hex keys, cable cutters, and about 20 minutes of focused time. YouTube your exact shifter model — Shimano 105, SRAM Rival, whatever you’re running — and you’ll find a walk-through in under a minute. But if this whole process feels genuinely overwhelming, a shop visit isn’t failure. It’s insurance that your next ride starts smooth instead of mid-adjustment.
Quick Checks Before Every Ride to Keep Shifts Clean
Once you’ve got shifting dialed in, these habits keep it that way:
- Wipe your chain weekly with a clean rag. Dirt buildup doesn’t directly cause shifting problems, but it accelerates cable and housing wear faster than most riders expect.
- Check cable ends monthly. No mechanic required — just look. Fraying starts small and gives you a window to act before a ride gets ruined somewhere inconvenient.
- Avoid cross-chaining. Big chainring paired with the biggest cassette cog, or small chainring with the smallest cog — those extreme angles stress housing and cables unnecessarily and you’ll feel it within a few hundred miles.
- Store your bike indoors. UV exposure and rain degrade cable housing faster than almost anything else. Even a basic $12 bike cover matters if outdoor storage is unavoidable.
A properly tuned drivetrain makes every ride feel measurably faster without changing a single component. Effort transfers cleaner. Cadence stays fluid. Hills feel slightly more manageable because you’re not fighting mechanical friction stacked on top of gravity.
That’s what makes a well-maintained drivetrain endearing to us cyclists — it rewards attention with actual performance. Not just a fixed problem, but a system you genuinely understand and can keep running yourself.

Stay in the loop
Get the latest adventure cycling world updates delivered to your inbox.