Why Tubeless Tires Fail to Seat
Tubeless setup has gotten complicated with all the conflicting advice flying around. As someone who has spent way too many trailhead mornings crouched over a wheel watching air disappear into nowhere, I learned everything there is to know about why tubeless tires refuse to seat. Today, I will share it all with you.
Three things cause this problem — ranked by how often I actually see them in the wild:
- The bead isn’t fully seated in the channel. One edge slips out of the rim’s U-shaped profile. That gap? No amount of pressure fixes it.
- Rim tape is compromised. Bubbles, lifted edges, gaps. Silent and brutal, every time.
- The valve core is loose or sealant has gummed it up. Air bleeds out through the stem before you even suspect it.
Before you rip the tire off and start from scratch, run through these three checks in order. You’ll find your culprit inside fifteen minutes. So, without further ado, let’s dive in.
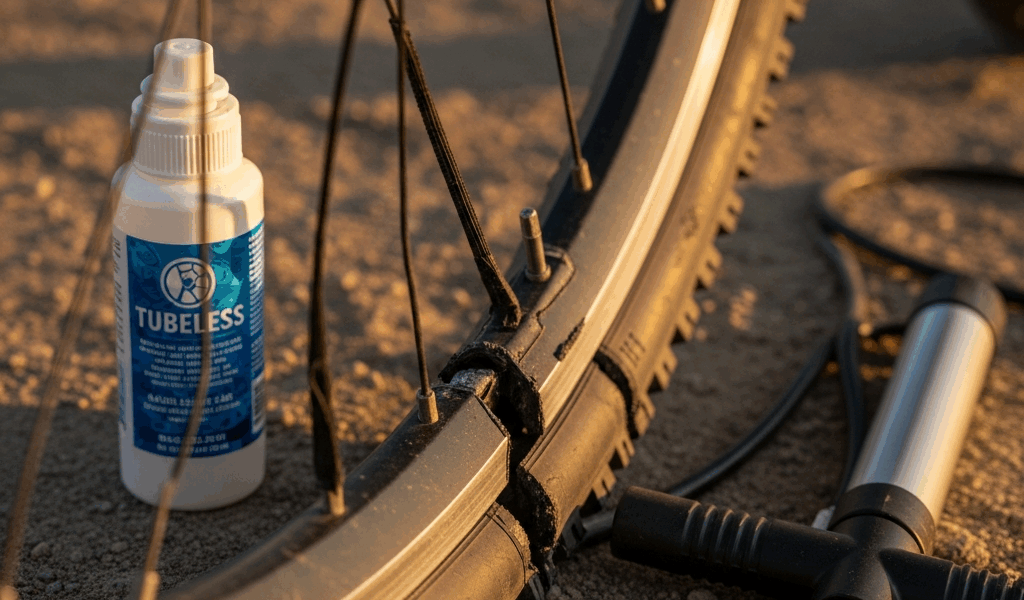
Fix 1 — Reset the Bead Without a Compressor
Not everyone has a 4-gallon compressor sitting in their truck bed. Most of us work with a floor pump, some soapy water, and whatever patience we have left.
Break the bead completely first. Ride it flat or use a lever to peel the tire away from the rim all the way around — both sides. This matters more than people realize. You’re resetting from zero, not patching a half-seated mess.
Wipe the rim bead seat with a dry cloth. Dust, dried sealant flakes, old grit — any of that stops the tire from sliding where it needs to go. Thirty seconds of cleaning. I learned this the hard way after fighting a Schwalbe Rocket Ron for twenty-plus minutes before noticing the rim was caked in six-month-old sealant crust. Don’t make my mistake.
Now the soapy water trick. Mix a small spray bottle — I use a $2 travel bottle from the drugstore — with water and literally one drop of dish soap. Wet the entire bead surface of the tire and the rim channel. That’s it. Friction drops dramatically and the rubber slides instead of grabbing.
Seat the tire by hand first. Work one side fully into the channel, then roll the tire around the rim, guiding it down evenly. For 650B or 700c gravel tires, figure two to three minutes. MTB tires are a different animal — stiffer, wider, more air volume under the tread. Expect five to ten minutes and genuine hand fatigue on a 2.4-inch Maxxis or similar.
Once it looks visually seated, grab your floor pump. A high-volume pump helps here — a big-bore Lezyne Pressure Drive or even a hand bellows gets the job done. Fast, deliberate strokes. One pump per second, not slow methodical pulls. You’re trying to build air volume quickly enough that the bead snaps into the channel. Target 30–40 psi in the first sixty seconds, not a gradual climb over three minutes.
Listen for the snap. Most tubeless tires pop or click audibly as the bead seats — sometimes one loud crack, sometimes a series of smaller ones around the rim. That sound means you’ve won. Pump to your target pressure and scan the bead line for leaks.
Still not seating after five solid minutes of this? The rim tape is your real problem. Jump to Fix 2.
Fix 2 — Inspect and Repair the Rim Tape Seal
Probably should have opened with this section, honestly. Rim tape failures cause more tubeless grief than bead issues do — but riders always blame the tire first. That’s what makes troubleshooting tubeless so maddening to us mountain bikers.
Pull the tire and inspect the tape under bright light. Three specific things to look for:
- Bubbles or wrinkles across the tape surface
- Gaps at the edges where tape doesn’t fully overlap the rim wall
- Lifted corners or peeling edges — especially right at the valve hole
The valve hole is where tape fails most often. You need real overlap — at least a half-inch of tape extending past the hole on every side before cutting. If your tape barely covers the hole, you’re one rough descent away from a leak. That’s not a theory. I’ve confirmed it personally at 50 psi on a rocky descent outside Moab. Not a great moment.
Two options for fixing tape. Small, isolated bubbles can be pressed down with a plastic roller or the back of a spoon handle — firm, sustained pressure for about thirty seconds per bubble, working center outward. Larger problems — lifted edges, gaps, anything near the valve — require full removal.
Heat helps with removal. A heat gun on low or a hair dryer softens the adhesive enough to peel without shredding the tape. Work slowly from one end, peeling at a shallow angle. Rushing tears the tape into useless strips.
Clean the rim with rubbing alcohol and a lint-free cloth. Let it dry completely. No shortcuts here.
Tape width matters more than most guides admit. A 29-inch rim with 25mm internal width needs at least 27–28mm tape. A 700c gravel rim at 19mm internal needs 21–22mm. Go too narrow and you leave the sidewalls exposed — that’s a guaranteed slow leak. Stan’s NoTubes tape, Gorilla Tape, and Schwalbe tape all work well. I’m apparently a Stan’s person and their 25mm tape works for me while generic hardware store tape never holds past the first ride. Match width to your rim and don’t improvise.
Apply fresh tape in one long strip. Start at the valve hole, wrap the full rim, overlap the starting point by an inch. Press firmly the entire way — use a roller or your palm, full width, steady pressure. Spend two solid minutes just pressing tape down after the initial application. Don’t skip this.
Cut a clean hole at the valve stem once the tape is set. A leather hole punch or a sharp utility knife both work. Size it so the valve passes through with roughly a quarter-inch clearance on all sides — tight enough to seal, not so tight you’re forcing the valve through.
Reinstall the tire and try the bead again. Most tape-related failures resolve on the second attempt.
Fix 3 — Check the Valve and Sealant
A loose valve core will cost you hours of troubleshooting before you even suspect it exists. I’ve been that rider — twice, embarrassingly.
Use your valve core removal tool. It’s the small hex-looking thing that comes in most tubeless kits — the Muc-Off kit includes one, as does the Stan’s starter kit. With the tire inflated, unscrew the core by a quarter turn. Listen specifically for air leaking around the core itself, not at the base where it meets the rim. A hiss means the core is loose. Tighten firmly and re-inflate.
Air leaking at the base — where the valve stem contacts the rim — usually means sealant has dried out and lost its seal. Remove the valve completely. Inside, you’ll often find a caked sealant plug, brownish and rubbery. Clean it out with a paper towel and a thin wire or old spoke. Reinstall and re-seal slowly — air pressure forces fresh sealant around the valve base as you inflate.
But what is the right sealant volume? In essence, it’s the amount that coats the interior without excess sloshing around. But it’s much more than that — it’s what determines whether your tire actually self-seals when you hit a thorn. For a 2.4-inch MTB tire, use 2–3 ounces of fresh sealant. For a 2.0-inch gravel tire, 1.5–2 ounces. I once overfilled a 2.3-inch Specialized Butcher with 5 ounces of Muc-Off and spent thirty minutes wondering why the bead wouldn’t pop. The sealant was sloshing inside and preventing bead contact with the rim. More is not better.
Old sealant is the silent killer here. Sealant dries out in three to six months — faster in hot, dry climates. Dried sealant won’t flow to seal punctures and creates an actual crust that prevents the bead from seating properly. If that tire has been sitting since last fall, drain it completely and refill. Stan’s No Tubes, Muc-Off, Orange Seal, Schwalbe — all work. Pick one and stick with it. Mixing brands sometimes causes clumping that makes everything worse.
When to Ride Tubeless and When to Go Back to Tubes
Sometimes the right answer is knowing when to stop fighting. If rim tape failed mid-ride, running a standard inner tube inside the tubeless tire is a real field fix. Remove what sealant you can, let the rim dry for a minute, install a tube. It’ll be messy. You’ll ride out. That’s what matters.
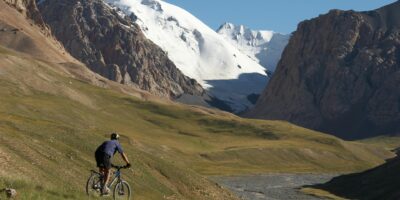
Back home, decide honestly whether tubeless makes sense for your riding. Smooth gravel roads and paved paths? Tubeless adds weight and maintenance for nearly zero benefit. Tires narrower than 2 inches? Flat protection is minimal anyway — the math doesn’t favor the setup complexity. But if you’re doing rocky singletrack on a 29er with a 2.4 or 2.6-inch tire, tubeless cuts flats by roughly seventy percent. That number is real and it’s been consistent across my riding seasons.
For casual riders, tubeless is probably overkill. For committed mountain bikers and gravel racers putting in real miles on real terrain — it’s worth every bit of the maintenance.

Stay in the loop
Get the latest adventure cycling world updates delivered to your inbox.